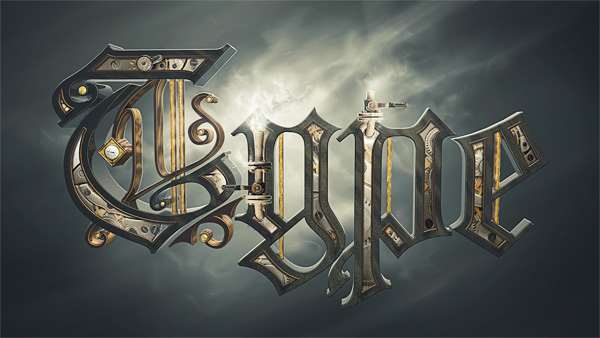
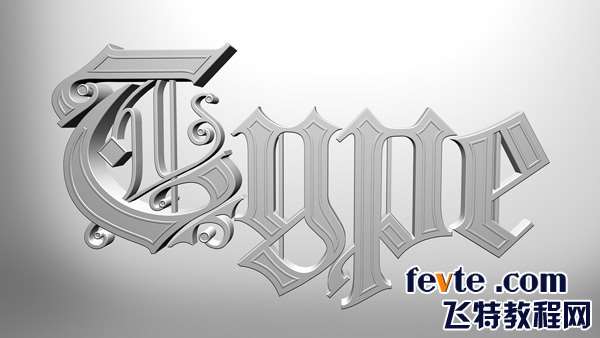
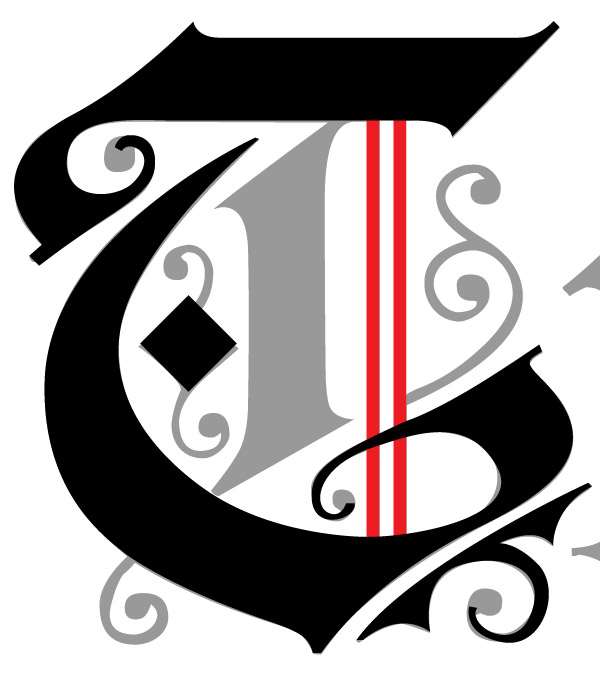
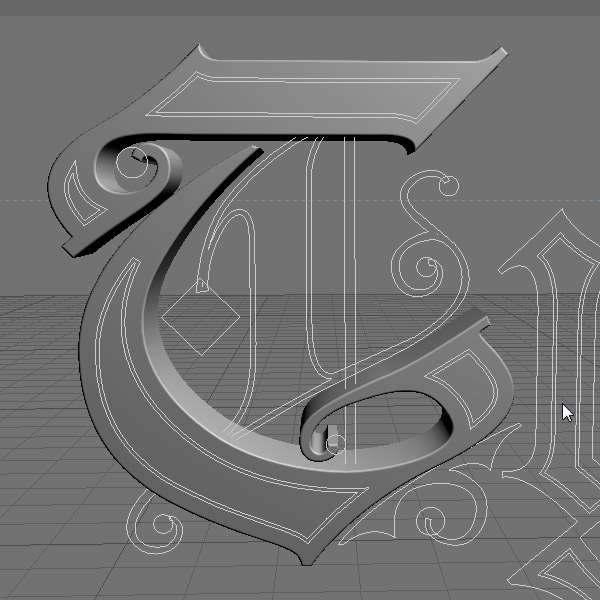
这篇教程教优图宝的朋友们用AI+Cinema 4D打造高贵的立体字,文字风格类似于玛雅时代的感觉。教程是国外的,我是用软件翻译的,看不大明白。先发到优图宝。让高手们先看看。期待高手给弄一个纯正的中文教程O(∩_∩)O哈哈~先看看效果吧:
Utobao编注:更多AI教程学习进入优图宝AI实例教程栏目:http://www.utobao.com/news/61.html
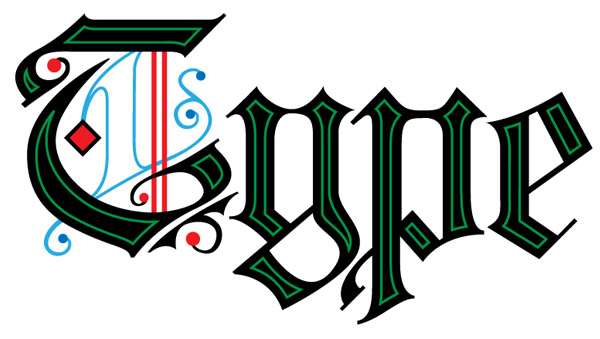
效果大图: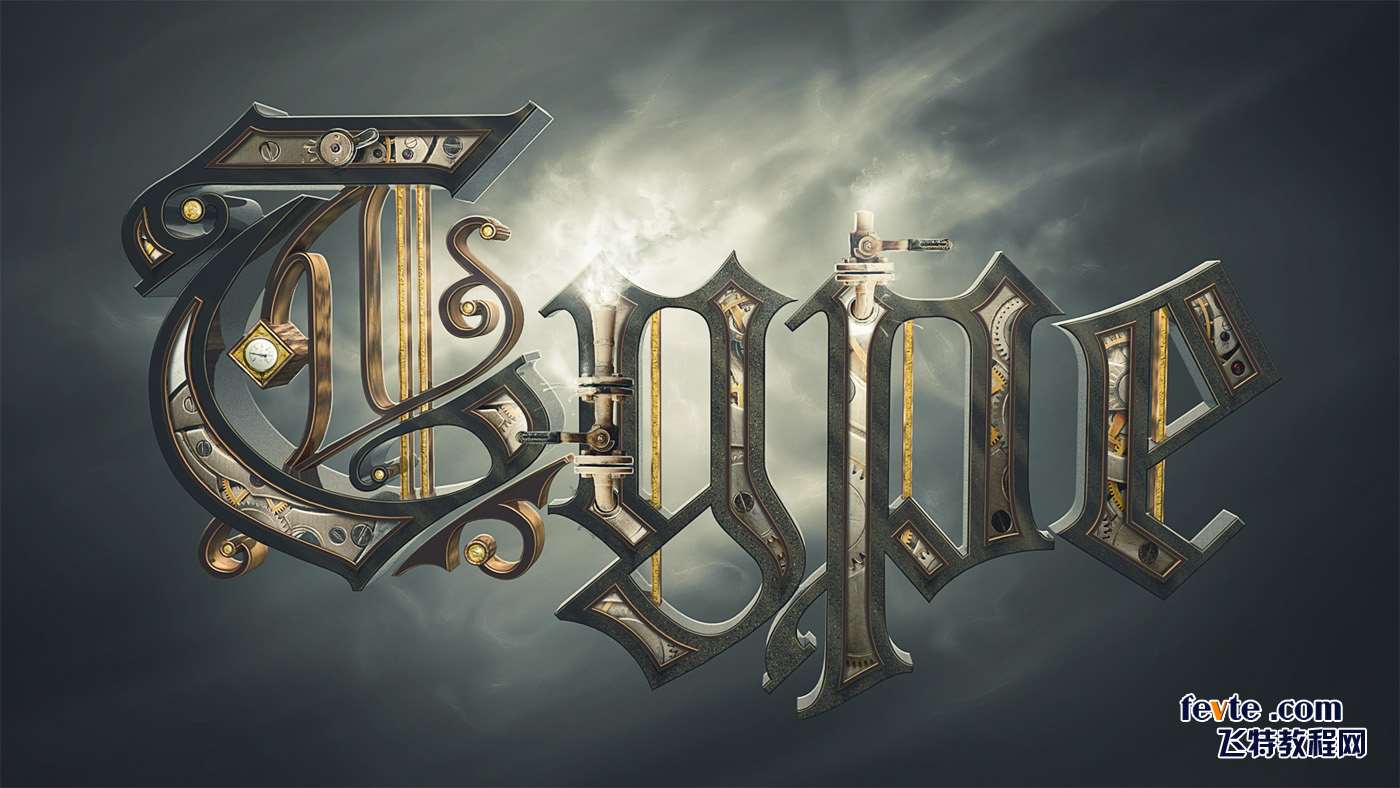
具体制作步骤如下:
For now though, we"re going to try and get this far.尽管如此,现在我们要设法弄到这么远。
Step 1第1步
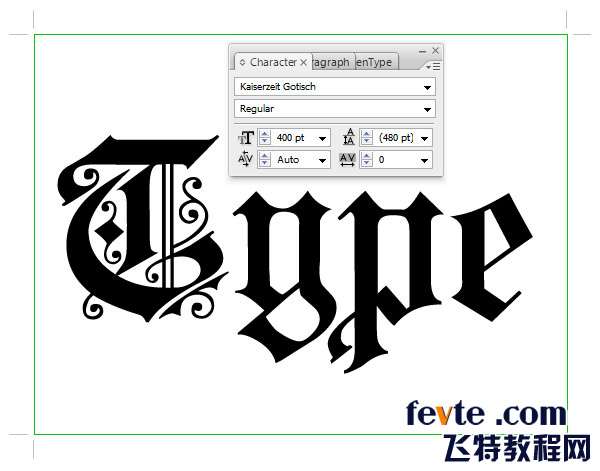
The first program on today's list is Illustrator.对今天的名单第一项计划是插图。 Start it up, create a new web document with standard settings and type in your word using this free font .启动它,您的Word中创建一个新的网页文件型标准设置和使用此免费的字体 。
Step 2第2步
As you can see when zooming in, the font has a lot of harsh edges because it's free, and not meant to be used for display purposes.正如你可以看到当放大时,字体边缘有许多苛刻的,因为它是免费的,并不意味着是用于显示用途。 We want a clean, few-endpoints font that won't reveal any bugs in Cinema 4D.我们希望有一个干净的,很少,端点字体不会显示任何错误的四维影院。 So turn down the Opacity of the text, and create a new layer.因此,拒绝文本不透明度,并创建一个新层。 Lock the previous layer and start to trace your own version of the first letter.锁定前层,并开始跟踪你的第一个字母自己的版本。
Step 3第3步
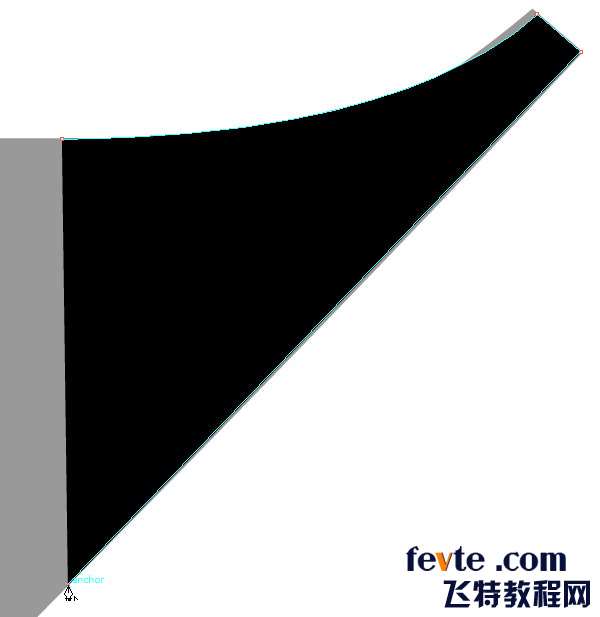
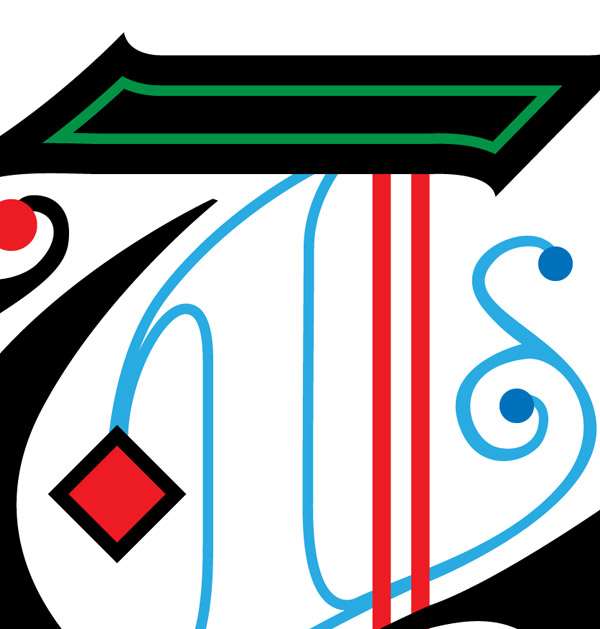
Try to keep the lines as smooth and natural as possible.尝试保持线条流畅自然为尽可能。 You may choose to follow the edges by the letter (pun totally intended) or create a slightly different version like I did.您可以选择完全遵循双关语意的信(边)或创建一个稍微不同的版本像我一样。
_ueditor_page_break_tag_Step 4第4步
Create a new layer underneath and create two bars over the old ones.创建一个新层下面,并建立两个以上的旧酒吧。 While the color has no importance, I chose different values to make the tutorial easy to follow.虽然颜色有没有重要性,我选择了不同的价值观,使教程容易。
Step 5第5步
Then on a layer above, create some dots with the Ellipse Tool (E).然后在1层以上,创建椭圆工具(e)一些点。 Create a rectangle too with the Rectangle Tool (M) and rotate it by 45 degrees.造成太大的矩形工具(M)一长方形,它旋转45度。

Step 6第6步
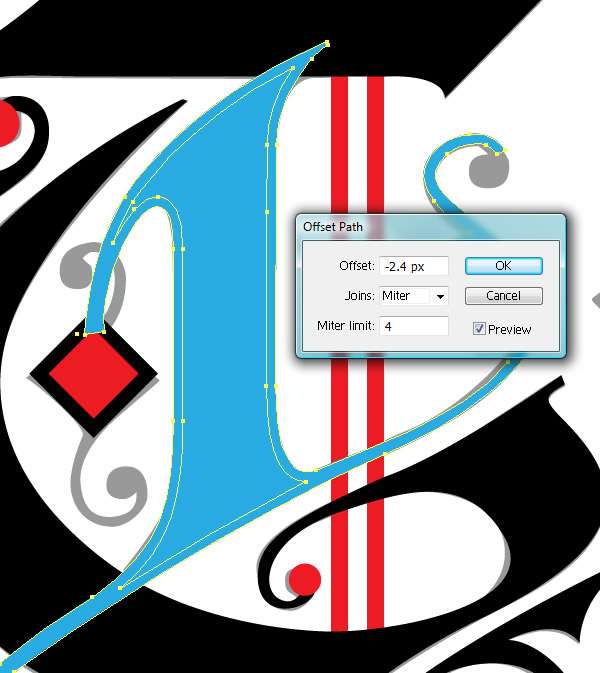
Then trace the… swirly thing near the center.然后跟踪...旋风,中心附近的事。 Once you've done that, go to Object > Path > Offset Path.一旦你这样做,到对象“>路径>偏移路径。 Use the values shown below.使用如下所示的值。
Step 7第7步
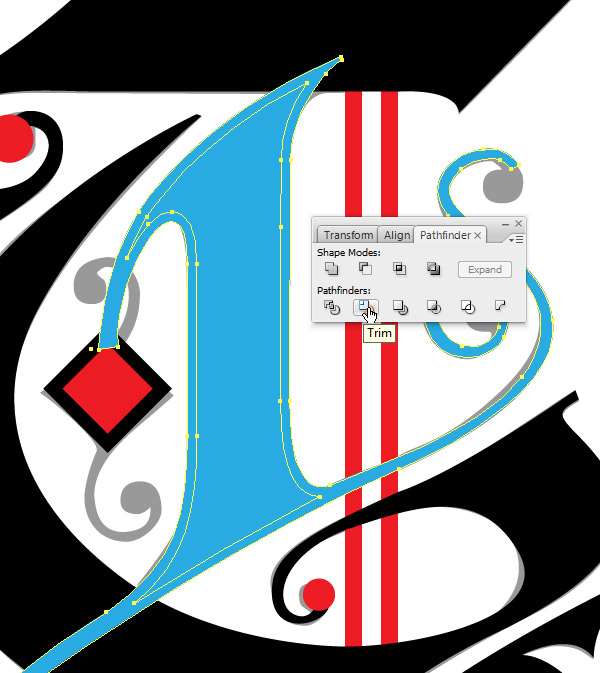
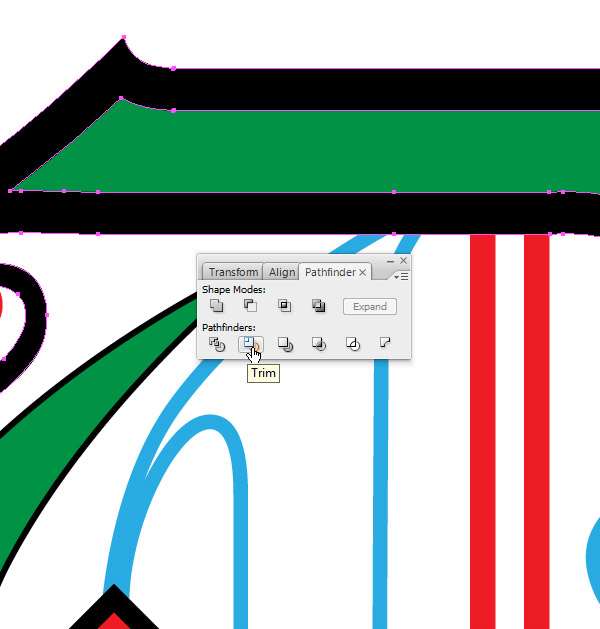
Locate your Pathfinder (Window > Pathfinder) and click on the Trim icon.找到您的探路者(窗口“>探路者)和装饰图标。
Step 8第8步
Select the Direct Selection Tool (A), or white arrow, and click firstly away from the object, then in the center.选择直接选择工具(A),或白色的箭头,单击首先远离对象,然后在该中心。 Delete that part.删除该部分。
_ueditor_page_break_tag_Step 9第9步
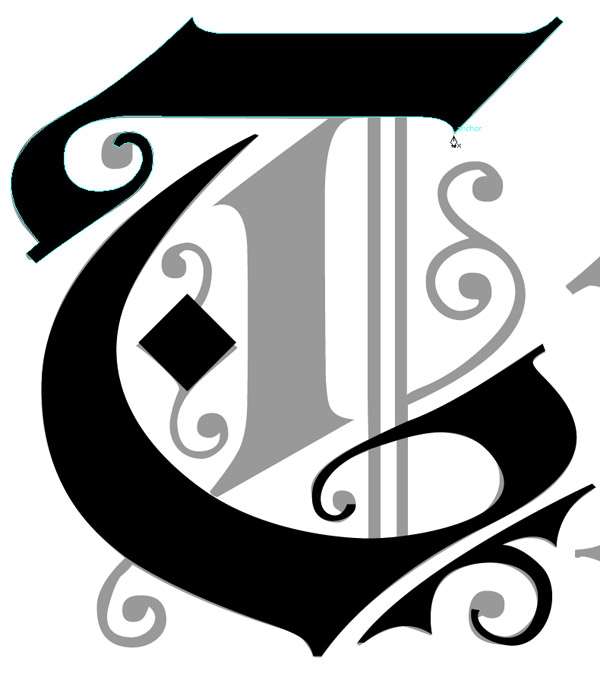
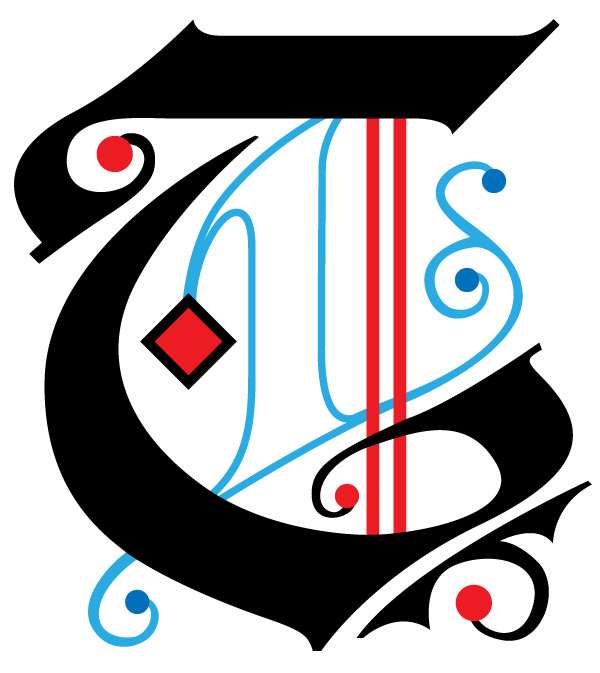
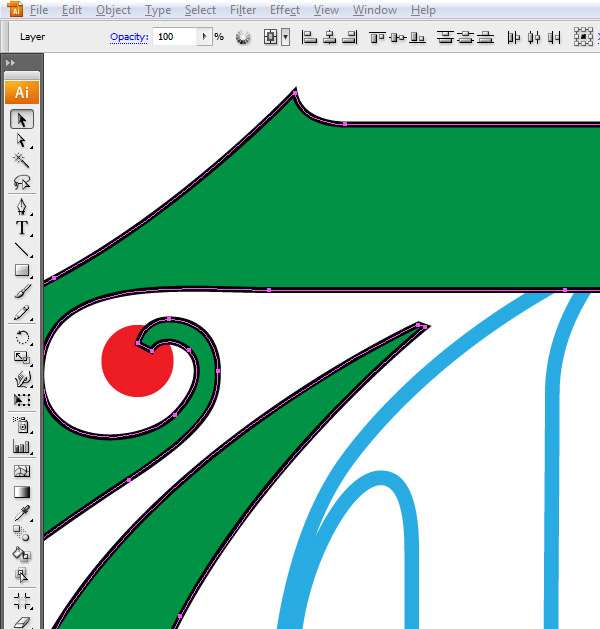
Now trace the rest of the word.现在追查其余的单词。
Step 10第10步
Copy all the letter faces and paste them on a separate layer (Command + F).将所有信件的脸和粘贴在一个单独的层(命令+ F)的他们。

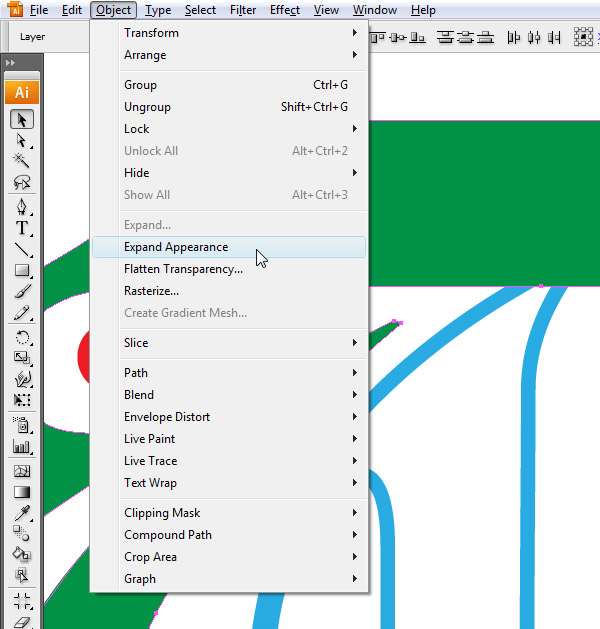
Step 11第11步
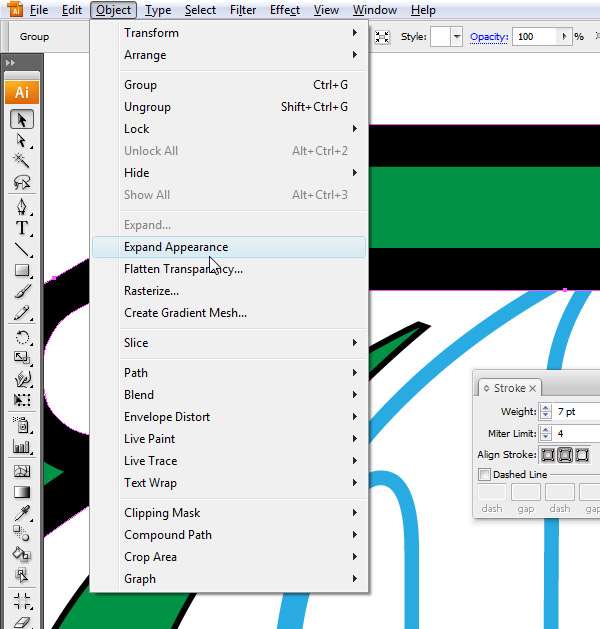
Go to Object > Expand Appearance.前往对象“>展开外观。
Step 12第12步
Go to Window > Stroke and give the text a 1 pt stroke.前往窗口“>中风,给文本一个1角中风。
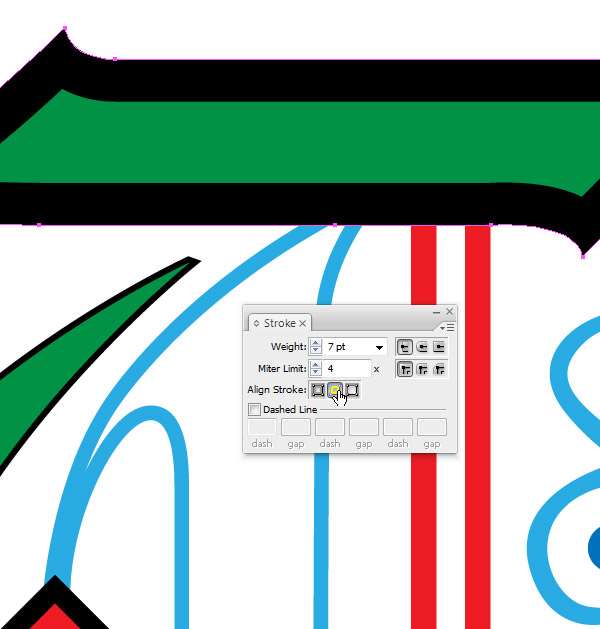
Step 13第13步
You'll now have to click away and click back to only the top part of the text.现在您必须按一下就回来,然后按一下只文本的顶部。 For some reason, you can't change the stroke alignment of all the elements at once.由于某些原因,你不能更改的所有元素在行程路线一次。 Anyway, change the alignment by clicking on the middle icon.无论如何,改变对中图标的对齐方式。 Also, change the Weight to 7 points.此外,更改重量为7分。
Step 14第14步
Now go to Object > Expand Appearance.现在去对象“>展开外观。
_ueditor_page_break_tag_Step 15第15步
Trim it with the Pathfinder.修剪与探路者也。
Step 16第16步
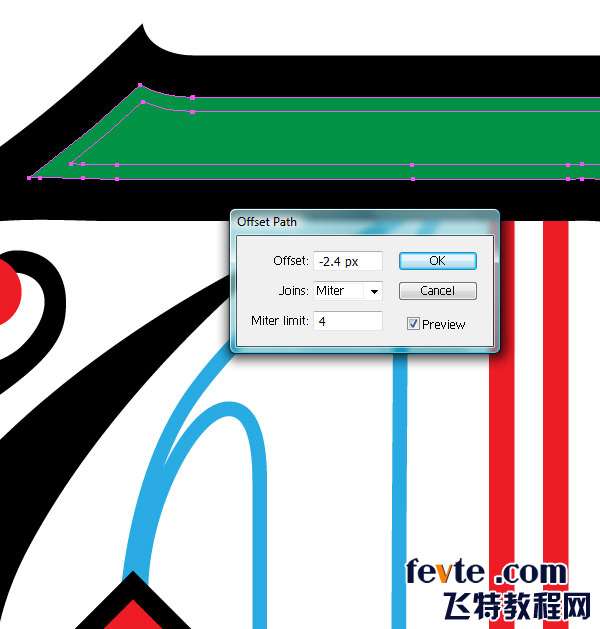
Then offset it by -2.4 pt.然后,它抵消了-2.4角。
Utobao编注:更多AI教程学习进入优图宝AI实例教程栏目:
http://www.utobao.com/news/61.html
Step 17第17步
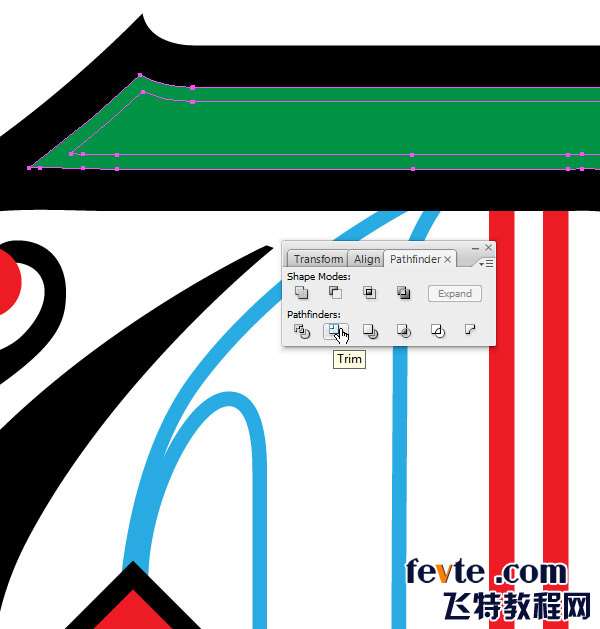
Trim it again to flatten the effect.修剪它再次压扁的效果。
Step 18第18步
Now you can use the Direct Selection Tool (A) to delete the center.现在你可以使用直接选择工具(a)删除该中心。
Step 19步骤19
Repeat this process for all the remaining portions of the text.重复的所有文字其余部分这一进程。
Step 20步骤20
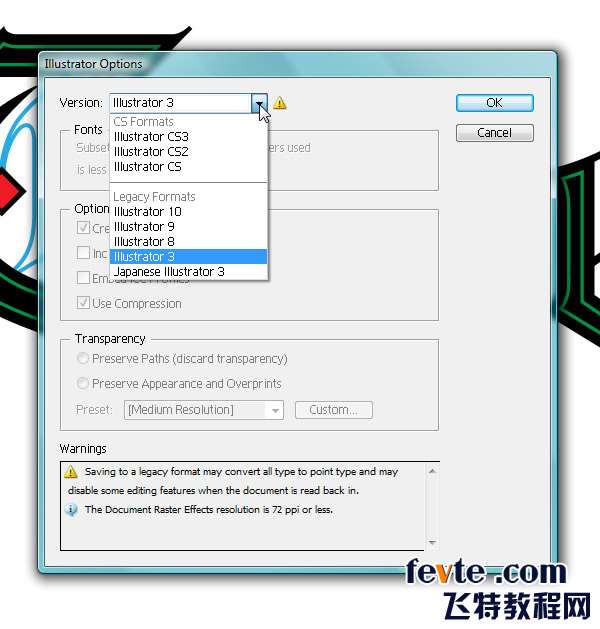
Now save it as an Illustrator 3 file.现在保存作为插图3文件。 Cinema 4D won't be able to access later formats.四维影院将无法访问后格式。
_ueditor_page_break_tag_Step 21步骤21
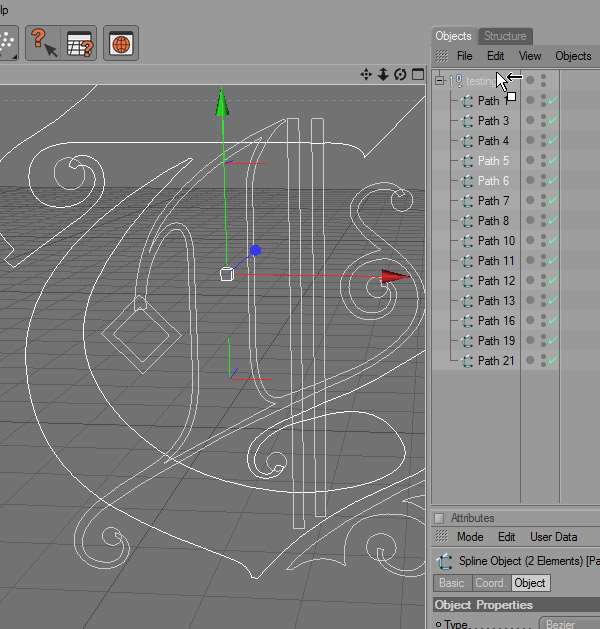
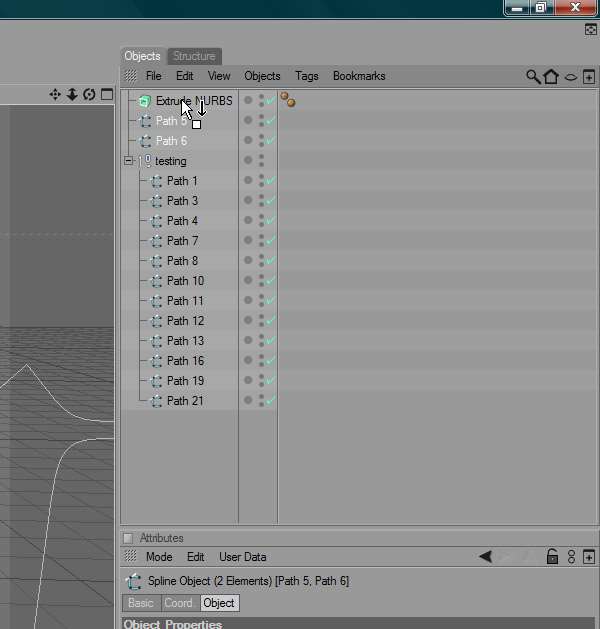
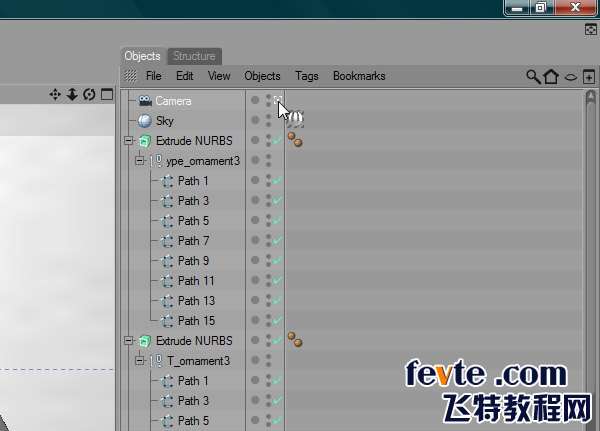
Our second software choice is Cinema 4D.我们的第二个软件的选择是四维影院。 Create a new Scene and go to File > Merge and locate the Illustrator 3 file.创建一个新的场景,转到文件>“合并,并找到Illustrator中的3个文件。 Click open to have the file placed inside the scene.点击打开里面有现场放置的文件。 Now go to your Objects panel and Shift-click on the first nine paths.现在去你的对象面板和Shift -点击第一个9路径。 Delete those.删除这些。 These are corner markers you get when importing the Illustrator file.这些都是角落标记你当导入Illustrator文件。

Step 22 22步
Move paths five and six away from the group by Shift-dragging them over the group in the Object Menu.移动路径五,六离小组移,在拖在对象菜单组他们。 Any object that you want to extrude individually, you'll have to separate from the group.任何对象要逐个挤压,你必须分开组。
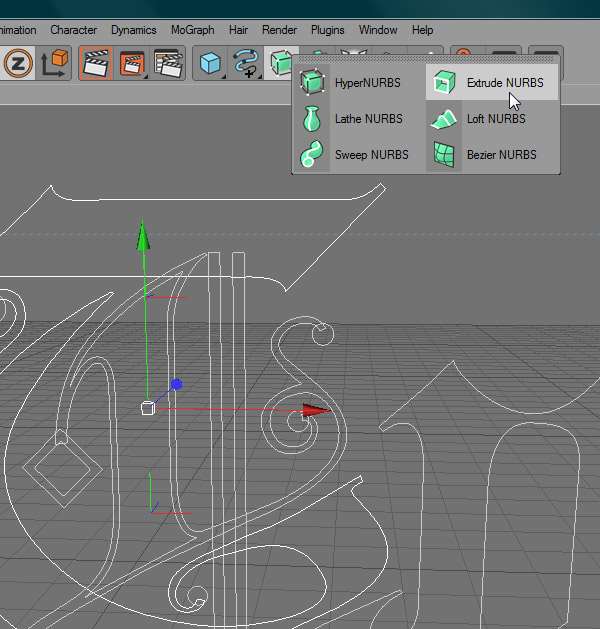
Step 23 23步
Now click and drag the Add HyperNURBS button and release over Extrude NURBS.现在,单击并拖动添加HyperNURBS按钮及以上挤出NURBS的释放。
Step 24 24步
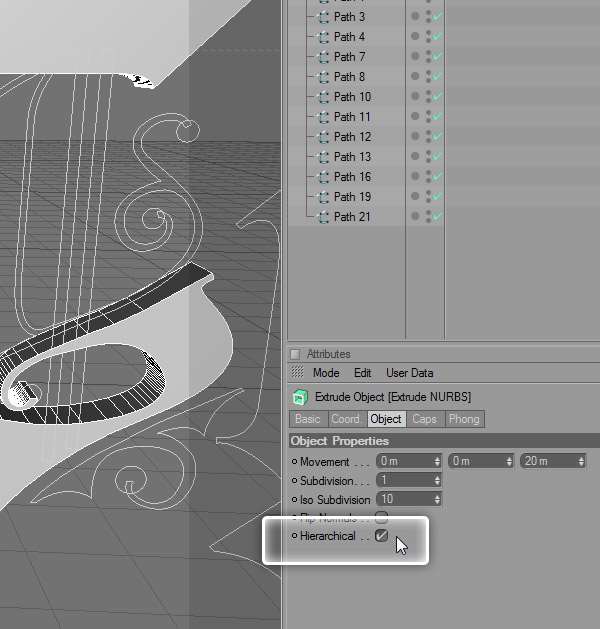
Shift-click on the two paths, and drag them on top of the Extrude NURBS.移点击两个路径,并拖动的挤压NURBS的顶部。
Step 25 25步
Tick the Hierarchical box.蜱分层框。 This means that the Extrusion will affect all the objects placed under the Extrude NURBS.这意味着挤压会影响所有的挤压下放置的NURBS对象。
_ueditor_page_break_tag_Step 26 26步
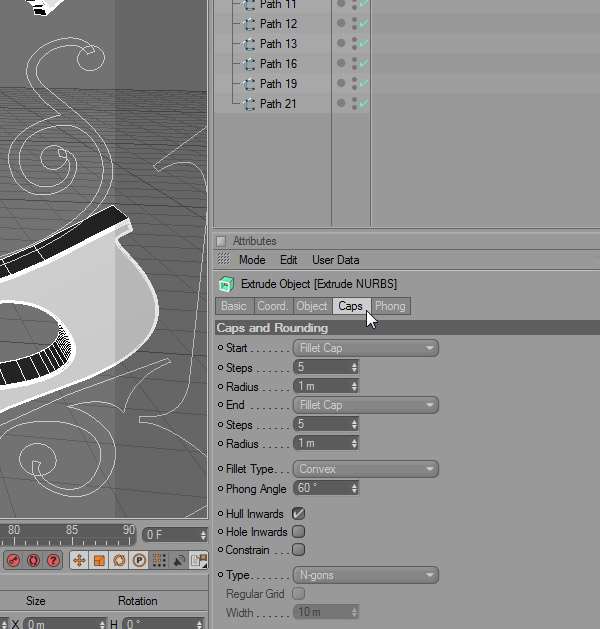
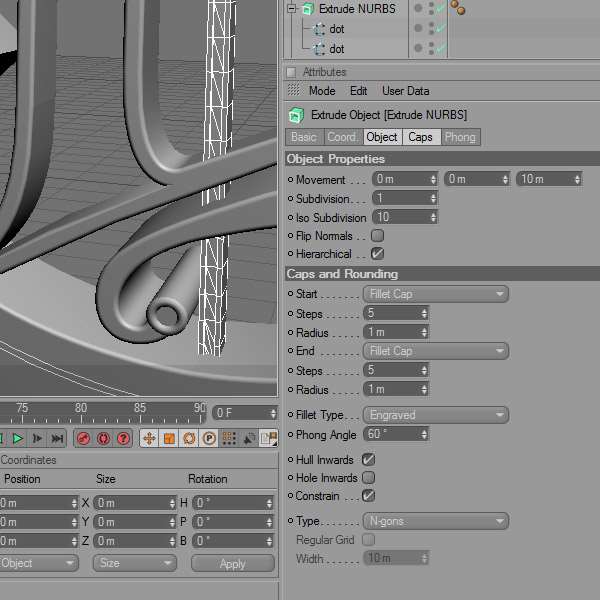
Click on the Caps tab and change the settings to those shown below.按一下标签上的帽子,改变这些设置如下。
 Step 27 27步
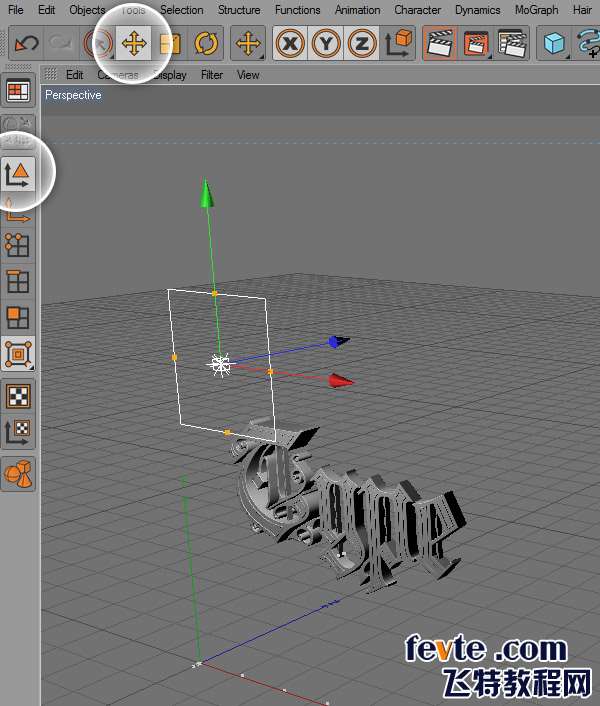
After doing this for each part of the letters, move the Extrude NURBS back and forth until you have the paths aligned at different points in space.在做每一个字母这部分,将挤出的NURBS来回,直到你有不同点在空间的路径一致。 Also, click back to the Object tab and change the Movement to 40.此外,单击返回到对象选项卡,改变运动40。
 Step 28 28步
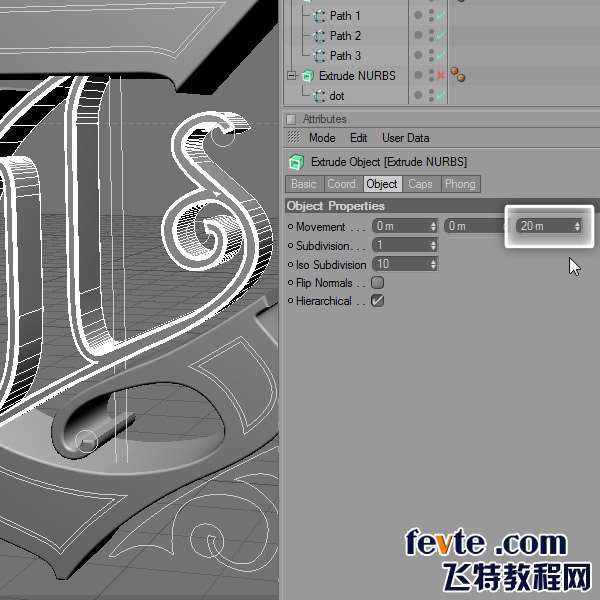
Pick the center detail and repeat the process explained above.选择该中心详细解释并重复上述过程。 Just change the movement to 20 meters.只需更改为20米运动。
 Step 29 29步
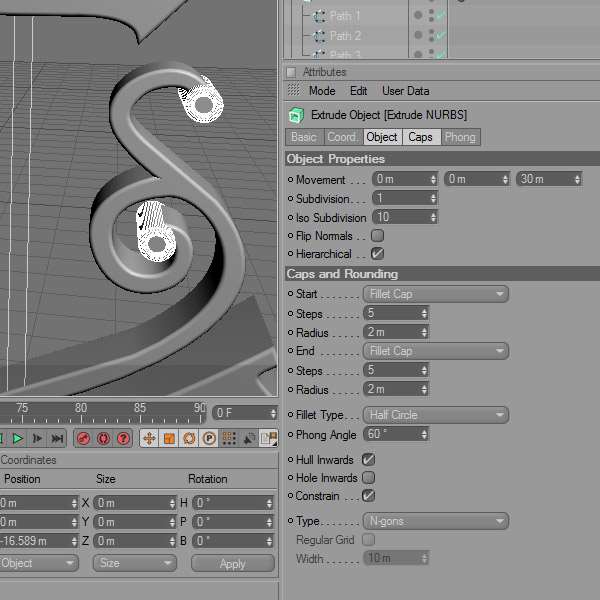
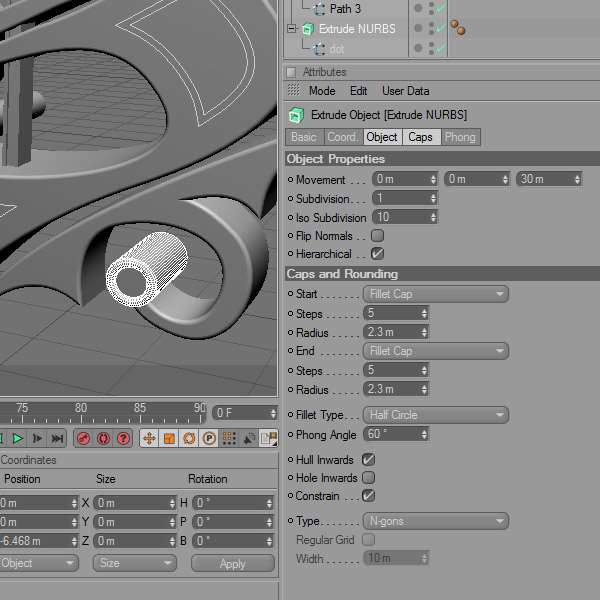
Next up are the dot paths.接下来是点路径。 You can see more tabs at once by Shift-clicking on two or more, in this case Object and Caps.你可以看到更多的标签上一旦被移位,点击两个或两个以上,在这种情况下对象和上限。 Use the following settings.使用下面的设置。 Notice that we've changed the appearance of the edges from a soft corner, to a half circle.请注意,我们已经改变了的边缘角落的外观由软到一个半圈。
 Step 30 30步
Then create the same Extrusion effect for paths 1, 2 and 3, but with a 30m Movement value.然后创建了路径1,同样挤出效应2和第3,但有一个30米运动的价值。
 _ueditor_page_break_tag_Step 31 31步
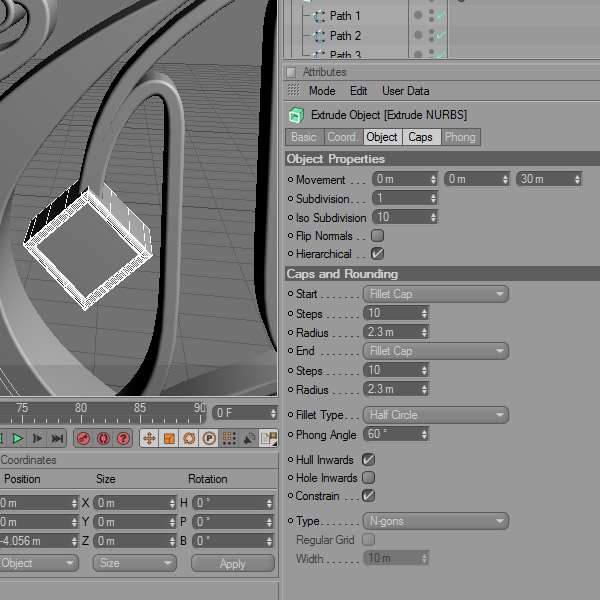
For the diamond, use slightly different values.对于钻石,使用稍微不同的价值观。 We've also constrained the effects to the original size by ticking the Constrain box for the dots and diamond.我们也制约了效果,勾选为约束点和钻石框原来的大小。 Doing that with small objects may create artifacts, or visual bugs.这样做,小的物体可能造成伪影,或视觉错误。 This happens when the constrained effect expands past the object dimensions.这种情况发生在过去的约束效应扩大对象尺寸。
 Utobao编注:更多AI教程学习进入优图宝AI实例教程栏目:http://www.utobao.com/news/61.html
Step 32 32步
Create an Engraved effect over the rod that connects the letter.创建一对连接杆刻的文字效果。
 Step 33 33步
Use the following settings for the final dot.使用最后点下面的设置。
 Step 34 34步
Finnish off the first letter by extruding the borders.芬兰由挤出关闭边界的第一个字母。
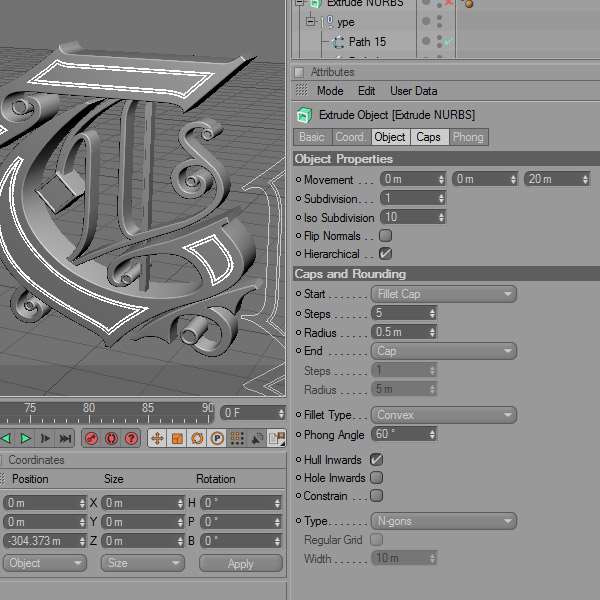 _ueditor_page_break_tag_Step 35 35步
Do the same for the remaining letters.这样做的,其余的字母相同。
 Step 36 36步
Copy the connecting rod (Command + C) and paste it (Command + V).复制连杆(命令+ C)和粘贴(命令+五)。 This will paste it in the exact same position.这将粘贴在完全相同的位置。
 Step 37 37步
Use the move tool to reposition the rod inside the following letter.使用移动工具来重新定位杆内的下列信。
 Step 38 38步
On the left side of the interface you have different methods of selecting an object.在界面的左侧你有一个对象选择不同的方法。 We want to move just the top endpoints in order to resize the rod.我们希望移动在排名前端点,以调整杆。 First though, hide the extrusion effect by clicking on the green check mark from the Objects menu.首先,虽然,隐藏在绿色复选标记的点击菜单中的对象挤出效应。 Then select the Point Tool and Move Tool (highlighted in the following screenshot) and Shift-click on the top two endpoints.然后选择点工具和移动工具(在下面的截图突出)和最高的两个端点移点击。
 _ueditor_page_break_tag_Step 39 39步
Drag the yellow arrow down until the dots disappear inside the letter.拖动黄色箭头点点消失,直到里面的信。
 Step 40 40步
Do the same for the bottom endpoints until they reach the bottom loop and bring back the Extrude NURBS.这样做的底部,直到他们到达终点相同的底部循环,带回挤压的NURBS。
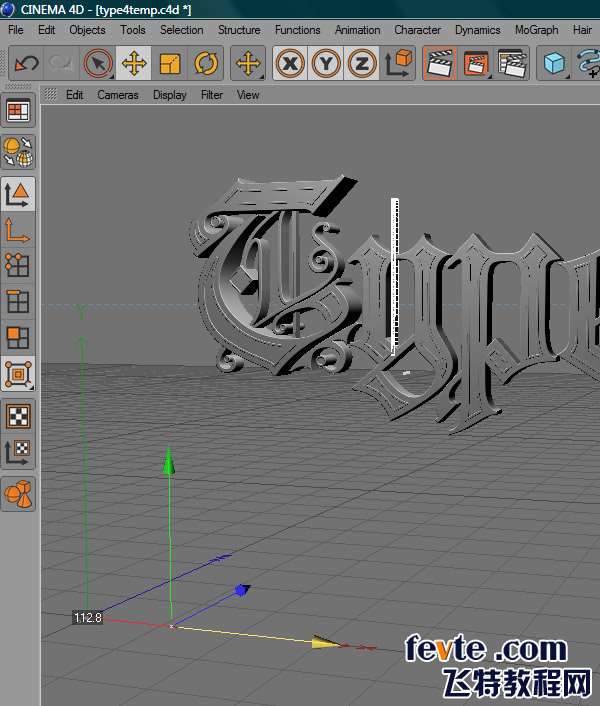
 Step 41第41步
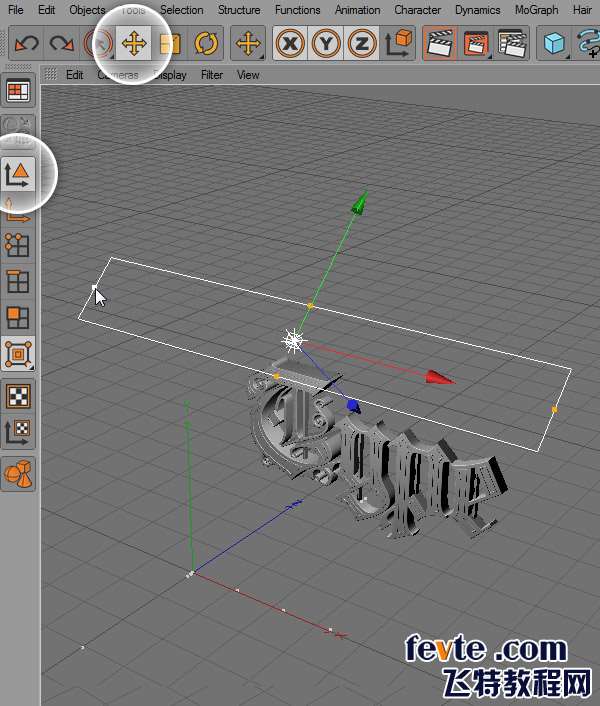
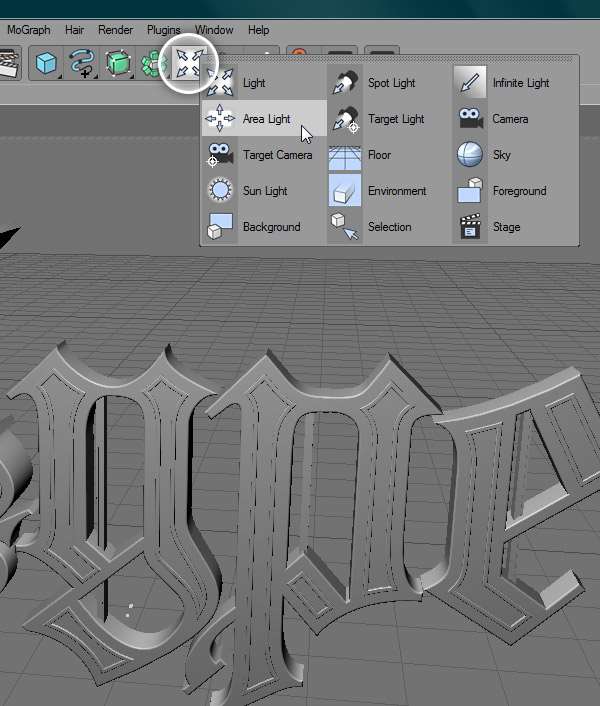
It's time to add a light source to the scene.是时候添加一个光源现场。 For the lighting, we're going to rely on an HDRI map environment and one Area Light.的照明,我们要依靠一个HDRI地图和一个地区的环境光。 First of all add an Area Light.首先添加一个区轻。
Step 42 42步
Bring it up over the text with the Move Tool.它带来了与移动工具的文本。
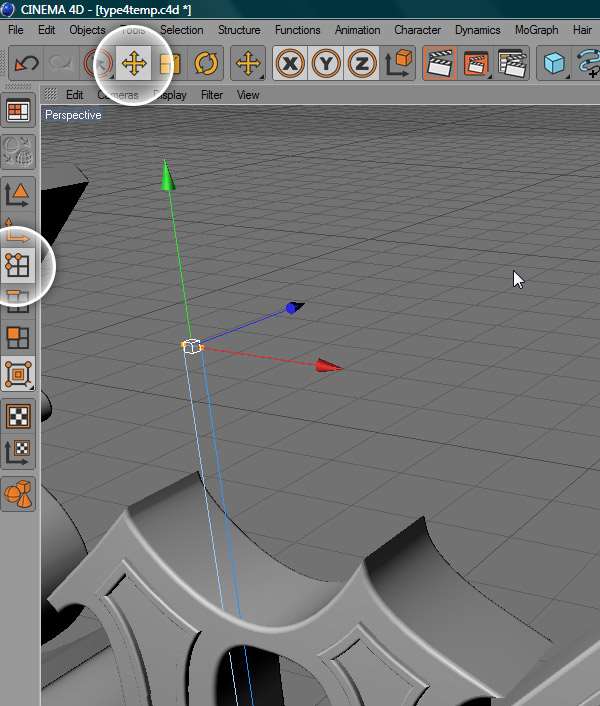
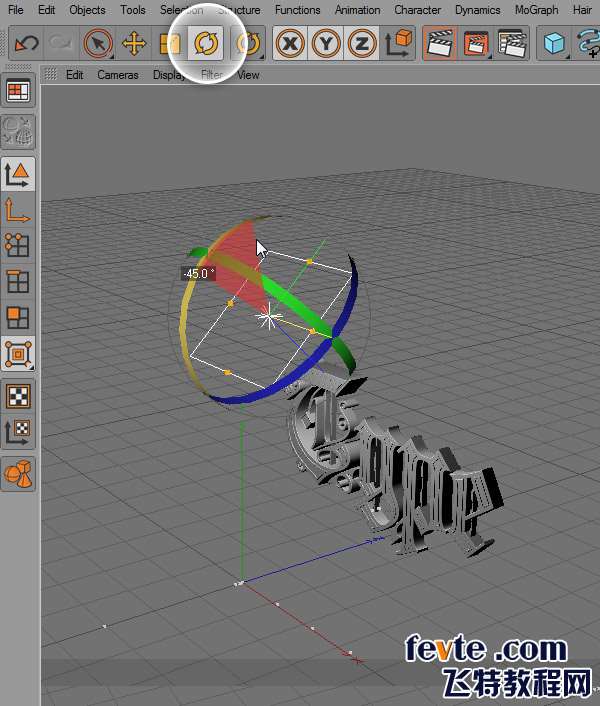
 Step 43 43步
Rotate it by 45 degrees with the Rotate Tool.旋转45度的旋转刀具。
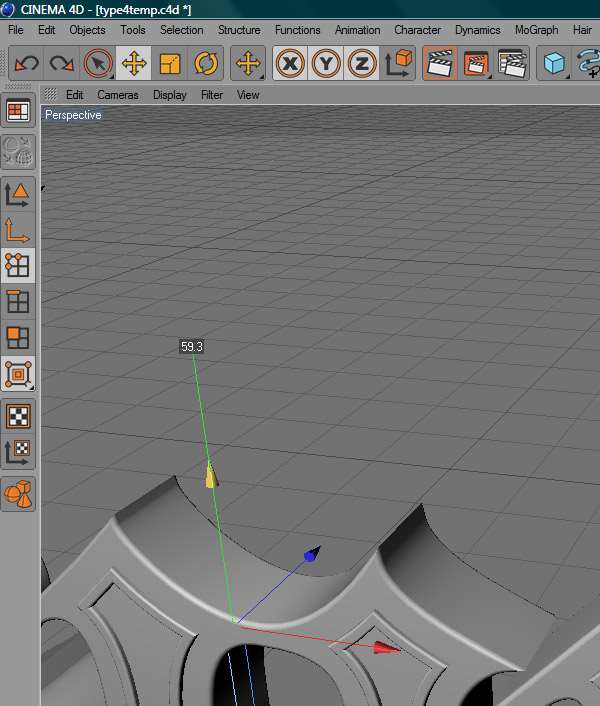
 _ueditor_page_break_tag_Step 44 44步
Change the dimensions by dragging the endpoints with the Move Tool.通过拖动改变尺寸与移动工具的端点。
 Step 45 45步
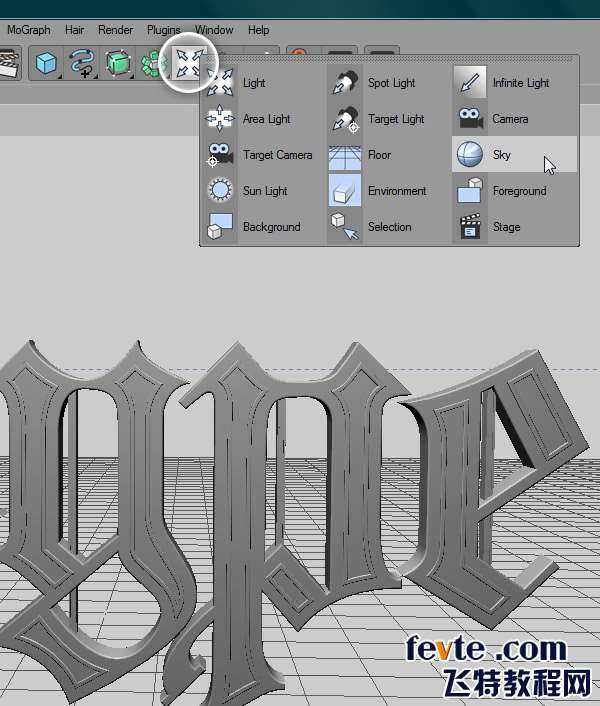
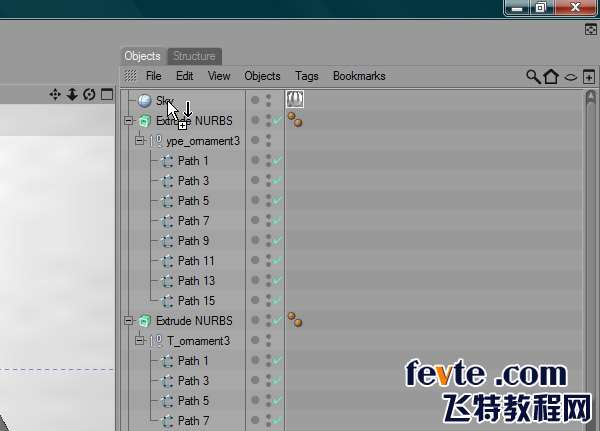
Now add a Sky Object.现在添加一个天空对象。
 Step 46 46步
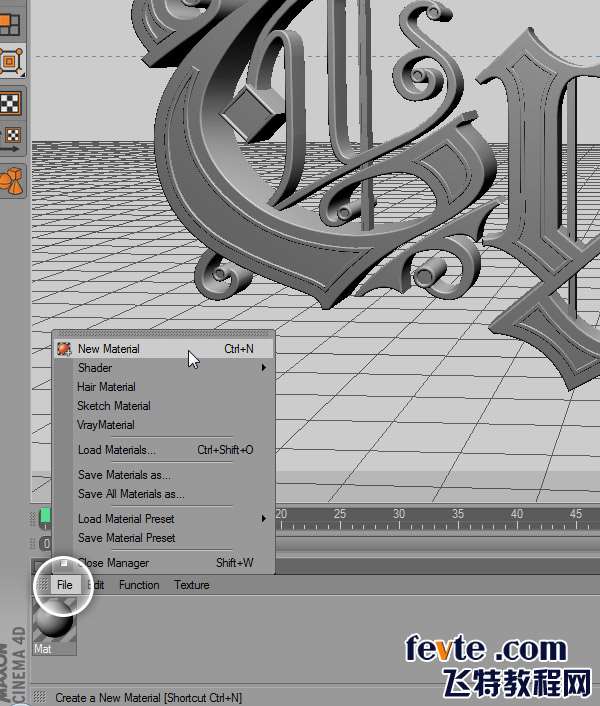
Create a new material from the Material Menu.创建一个新材料的材料菜单。
 _ueditor_page_break_tag_Step 47 47步
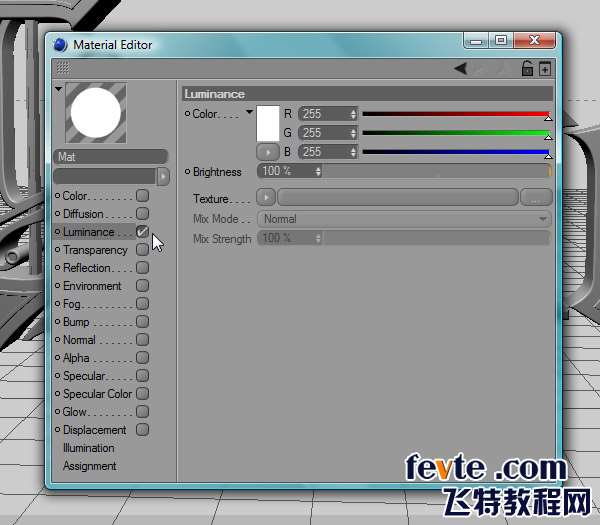
Double-click on the material icon from the menu to bring up the Material Editor.双击该图标,从菜单材料点击弹出材质编辑器。 Uncheck all the boxes and activate Luminance.取消选中所有的箱子和激活亮度。 You'll now need this free HDRI map collection .现在您需要此免费HDRI地图收藏 。 Remember where you place it, and don't make it a temporary location.记住你的地方它,不使它成为一个临时位置。 Try to find a safe spot because you may find yourself linking more files to these HDR files.希望可以找到一个安全的地方,因为你会发现自己更多的文件连接到这些人类发展报告文件。 After you press Open, you'll be asked if you want to copy the HDR file to the root folder.后按打开,你会被询问是否要复制人类发展报告文件到根文件夹。 You can do that, or press No if you don't move the folder after this point.你可以这样做,或按不如果你不提出这个问题后,该文件夹。
 Step 48 48步
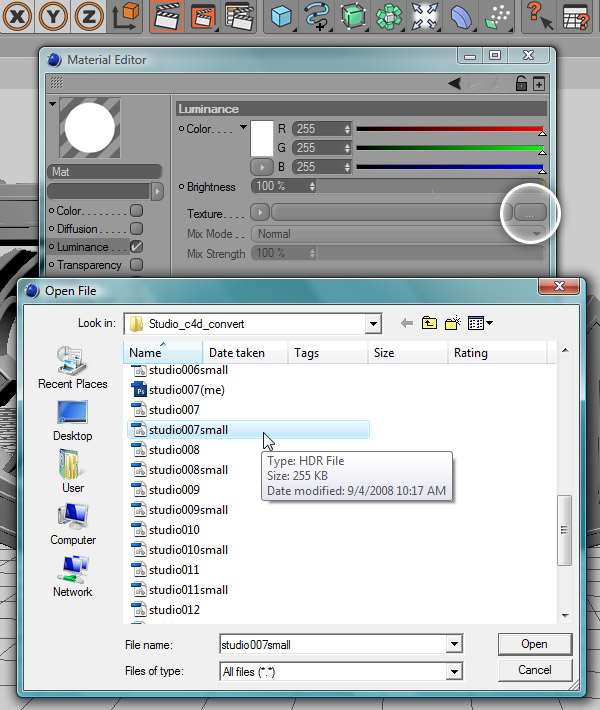
Click on the three dot button and find the studio number seven from the folder.这三个点上按一下按钮,找到工作室的数目从文件夹7。 Open the small version.打开小版本。
 Step 49 49步
Drag the material over the Sky object.在天空拖动对象的材料。
 Step 50 50步
Find an appropriate angle to view the text from and add a Camera.找到合适的角度,以查看文字并新增一个相机。
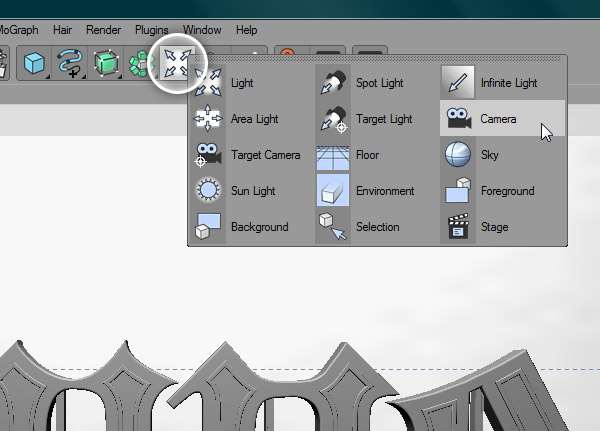 Step 51 51步
To activate the camera, click on the white icon from the Object menu.要启动相机,在从对象菜单白色图标。
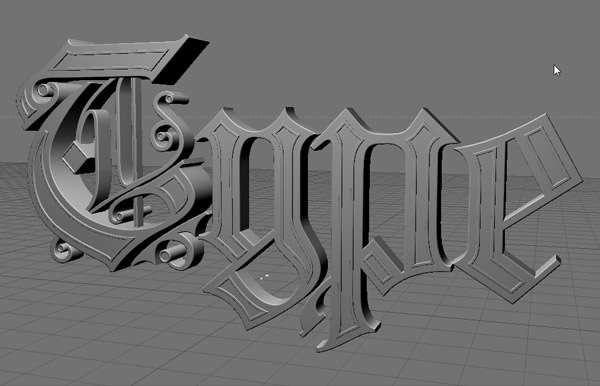
 Final Result最终结果
A quick render will reveal what we've done in this first part of the tutorial.快速渲染就会发现我们已经在本教程的第一部分进行。 In this render, I've duplicated the light source for more brightness.在这种渲染,我已经重复了更多的亮度光源。 You won't need that for Part II though.你不会需要,对于第二部分,虽然。 I'll see you next time when we'll add textures and a scene to our text!我会看到你下一次,当我们将添加纹理,以及我们的文字场面!
最后的纹理和一些装饰我是在PS里完成的。这里就不做说明了。最终效果Utobao编注:更多AI教程学习进入优图宝AI实例教程栏目:http://www.utobao.com/news/61.html
相关资讯
-
网上很多教程都介绍说,“在使用Illustrator渐变网格建立一个不规则的形状网格时,最好先用基本图形建立,然后再用白箭头拉成想要的形状……”但个人感觉这似乎是个非常被动的做法,特别对我这种点半天都点不中 ...
2019/1/16 14:25:26
-
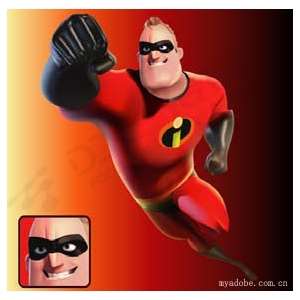
当时正好给我的学生讲到了Illustrator的渐变网格,《超人总动员》正在热映,所以随手就拿来当例子了。现在想想幸亏当时热映的不是《冰河世纪》!当然案例是分三次做完的,大概用两天时间,最难画的地方是超人的 ...
2019/1/16 14:25:25